The Elegant Mud Solution
Winter brings snow, rain, and inevitably, mud. Protecting your floors is essential, but standard rubber mats are often ugly and industrial. A custom DIY boot tray is the perfect solution to keep your entryway clean without sacrificing style.
Whether you live in a farmhouse or a modern apartment, upgrading your shoe storage is a quick afternoon project. In this guide, we explore 5 creative ways to build a DIY boot tray that handles the mess while looking beautiful.
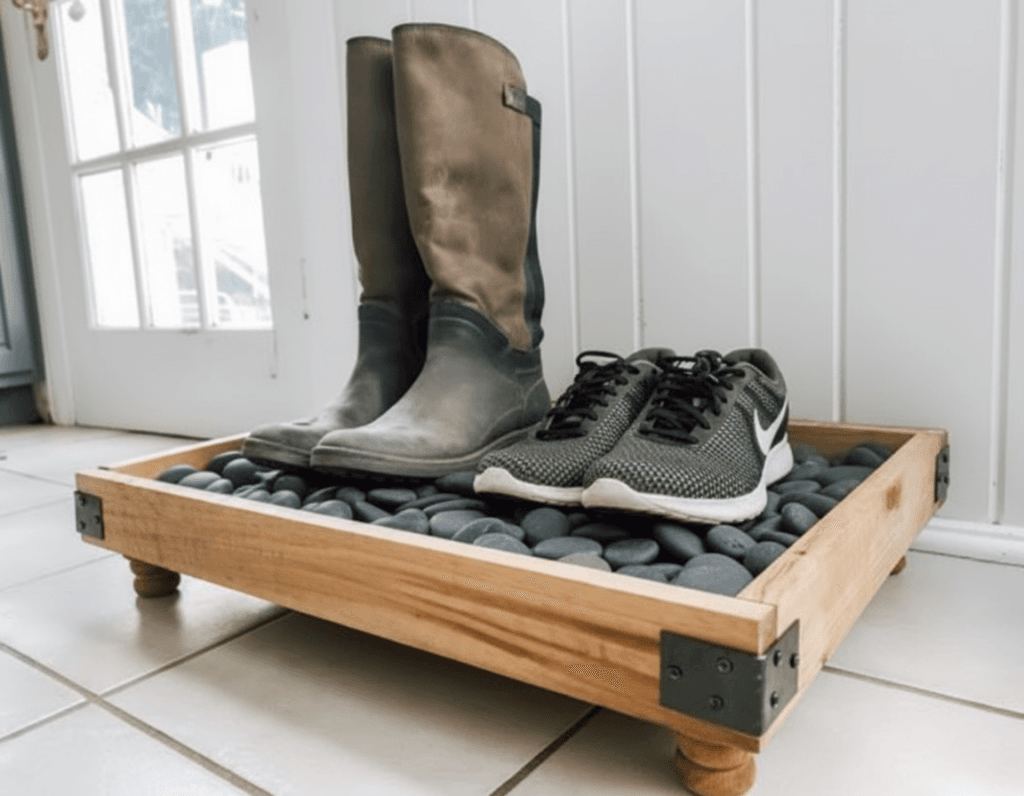
1. The “River Rock” Drainage Tray
The spa-like aesthetic.
This is the most popular DIY boot tray on Pinterest because it allows snow to melt and drain through the stones, keeping the boots dry.
- The Base: Use a large, deep baking sheet or a sturdy plastic serving tray.
- The Fill: Fill it to the brim with smooth River Rocks.
- Why it works: The stones hide the dirt and water. To clean it, simply take the tray outside and hose the stones down.
2. The Rustic Wood Frame
Best for: Farmhouse decor.
If you have a plastic tray that works but looks cheap, hide it.
- The Build: Cut 1×3 scrap wood to create a simple frame that fits snuggly around your existing rubber mat.
- The Finish: Stain the wood a dark walnut and add two metal handles on the sides.
- The Result: A custom DIY boot tray that looks like a high-end furniture piece.
3. The Copper Sheet Tray
Best for: Modern/Industrial homes.
Copper is naturally antimicrobial and looks stunning against wood floors.
- The Material: You don’t need solid copper (too expensive). Use a galvanized steel sheet.
- The Hack: Spray paint it with Metallic Copper Spray Paint and seal it with a clear coat.
- Assembly: Bend the edges up or frame it with light wood strips.
4. The Rolling “Under-Bench” Crate
Best for: Small entryways.
If you hate tripping over shoes, hide this DIY boot tray under a bench.
- The Build: Use a shallow wooden crate or build a box from plywood.
- The Secret: Attach four Swivel Caster Wheels to the bottom.
- Usage: Roll it out to put boots away, then kick it back under the bench. It keeps the visual clutter completely hidden.
5. The Repurposed Picture Frame
The budget-friendly upcycle.
Have an old, large picture frame? Turn it into a tray.
- The Hack: Remove the glass. Replace the backing with a piece of waterproof vinyl tile or a painted plywood board.
- Protection: Add felt pads to the bottom to protect your floor.
- Style: Paint the frame gold or black for a chic DIY boot tray.
PRO TIP: Waterproofing is Key
A DIY boot tray faces constant moisture. If you are using wood, you cannot skip the sealing step.
- The Product: Apply 3 coats of Minwax Polycrylic.
- Why? Unlike Polyurethane, Polycrylic doesn’t yellow over time and provides a rock-hard, water-resistant finish that prevents the wood from warping or rotting under wet boots.
FAQ: Entryway Organization
Q: How big should a DIY boot tray be?
A: A standard tray should be at least 15 inches deep and 30 inches wide. This accommodates about 3 pairs of adult boots comfortably. Measure your space first!
Q: Do river rocks scratch boots?
A: No, smooth river stones are gentle. However, they can scratch your floor if they spill out. Always glue a layer of felt or cork to the bottom of your DIY boot tray.
Q: How do I clean a rock-filled tray?
A: Water evaporates from the rocks naturally. For deep cleaning (mud/salt buildup), dump the rocks into a colander, rinse them with warm soapy water, and let them dry before refilling your DIY boot tray.