Origami flowers have become a popular craft for many people around the world. Not only do they provide a creative outlet, but they also serve as beautiful decorations, thoughtful gifts, and engaging activities for all ages. In this article, we will explore the fascinating world of origami flowers, including their history, the materials you’ll need, step-by-step instructions for creating various flower designs, and creative uses for these stunning paper creations.
What Is Origami?
Origami, derived from the Japanese words “oru” (to fold) and “kami” (paper), is the art of paper folding. This ancient practice dates back to the 17th century in Japan, although its roots can be traced back even further to China. Initially, origami was used for ceremonial purposes, such as folding paper for religious rituals or traditional Japanese weddings. Over time, it evolved into a popular pastime, spreading across cultures and inspiring countless artists and enthusiasts.
At its core, origami is about transforming a flat piece of paper into a three-dimensional object through a series of precise folds. The beauty of origami lies in its simplicity; anyone can learn to fold paper, regardless of age or skill level. When it comes to flower designs, origami allows for endless creativity. From delicate roses to vibrant tulips, the possibilities are limited only by your imagination. The accessibility of origami makes it a perfect activity for families, classrooms, and crafting communities.
Materials You’ll Need
Before diving into the world of origami flowers, it’s essential to gather the right materials. While origami can be done with any paper, certain types work better for specific designs. Here’s a breakdown of what you’ll need:
Choosing the Right Paper
- Square Paper: Most origami designs require square sheets of paper. You can purchase pre-cut origami paper, which often comes in various colors and patterns, or cut your own from larger sheets. A typical size for beginners is 6 inches by 6 inches, but you can experiment with different sizes to create unique effects.
- Textured Paper: Textured paper adds depth and character to your origami flowers. Consider using papers with a subtle texture, such as linen or handmade paper, to give your flowers a more organic feel.
- Colored Options: Vibrant colors can bring your origami flowers to life. Choose a variety of colors to create bouquets or mixed arrangements. You can also use double-sided paper, which has different colors or patterns on each side, for added visual interest.
Optional Tools
While origami can be done with just paper and your hands, a few optional tools can enhance your experience and improve the quality of your folds:
- Scissors: Although most origami designs do not require cutting, you may want scissors for specific projects or to create custom shapes.
- Glue: Some designs may benefit from a small amount of glue to hold pieces together. Use it sparingly to maintain the integrity of the origami.
- Bone Folder: This tool is invaluable for achieving crisp, precise folds. A bone folder helps to create clean edges and can make a significant difference in the final appearance of your flowers.
How to Make Origami Flowers

Creating origami flowers is a rewarding and enjoyable process. Below, we will outline the steps for making a basic origami flower, along with variations to expand your skills.
Step 1: Gather Your Supplies
Before you begin, lay out all your materials. Having everything within reach will help you focus on the folding process without interruptions. Ensure you have your square paper, optional tools, and a clean workspace to avoid distractions.
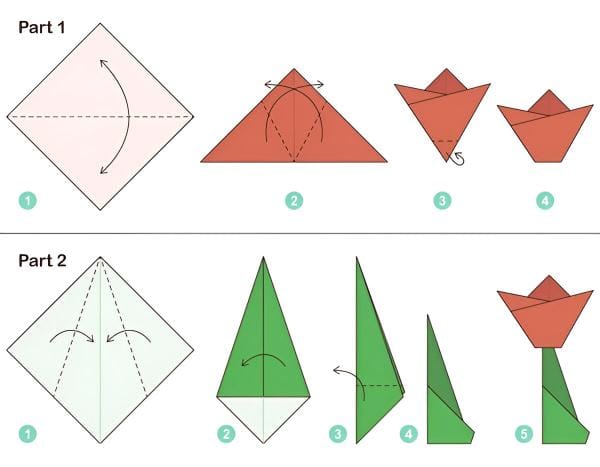
Step 2: Fold Basic Petals
To start, let’s create a simple flower design. We’ll use a basic petal shape that can be adapted for various flowers.
- Begin with a Square Sheet: Place your square paper on the table with one color facing up (if using double-sided paper).
- Fold Diagonally: Fold the paper in half diagonally to form a triangle. Crease the fold well and then unfold it.
- Fold the Opposite Diagonal: Repeat the process with the other diagonal, creating an “X” crease pattern on your paper.
- Fold in Half: Fold the paper in half horizontally, bringing the top edge down to meet the bottom edge. Crease well and unfold.
- Create the Petal Shape: Now, fold the top corner down to the center crease line, creating a triangle at the top. Repeat this step with the other top corner.
- Final Petal Folds: Fold the bottom edge of the paper up to meet the top point. This will create a petal shape. Repeat this process for additional petals, depending on how many you want for your flower.
Step 3: Assemble the Petals into a Full Flower
Once you have your petals ready, it’s time to assemble them into a flower.
- Position the Petals: Arrange your folded petals in a circular pattern, overlapping them slightly to create a full flower shape.
- Secure the Petals: If you’re using glue, apply a small amount to the base of each petal where they overlap. If you prefer not to use glue, you can carefully tuck the petals into each other to hold them in place.
- Add a Center: For added detail, create a small circle from a contrasting color paper and place it in the center of your flower. You can also use a small pom-pom or bead if you want a more textured center.
Step 4: Add Details Like a Stem or Center
To complete your origami flower, consider adding a stem or extra details:
- Create a Stem: Cut a strip of green paper for the stem. The strip should be long and narrow, approximately 1 inch wide and 12 inches long. You can fold it in half lengthwise for added sturdiness.
- Attach the Stem: Use glue to attach the stem to the base of your flower. You can also create leaves from green paper to enhance the overall look.
- Final Touches: Adjust the petals and leaves as needed for a natural appearance. You can also use a bone folder to sharpen any creases and ensure everything looks tidy.
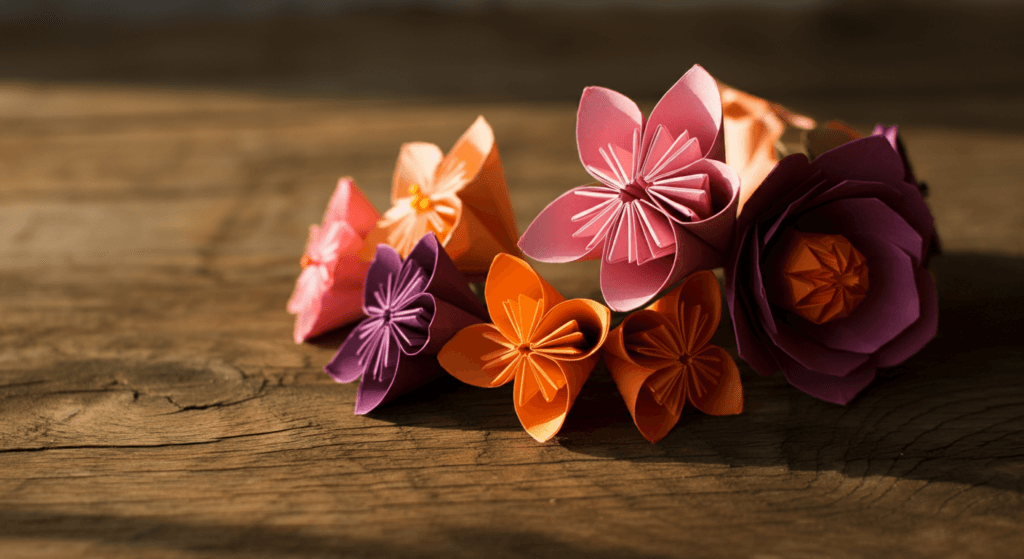
Examples of Origami Flowers
Once you’ve mastered the basic flower design, you can explore various types of origami flowers. Here are a few popular options:
Tulip: Perfect for Beginners
The tulip is a classic origami flower that is ideal for beginners. Its simple folds and elegant shape make it a favorite among origami enthusiasts.
- Start with a Square Sheet: Follow the same initial steps as before to create the base folds.
- Create the Tulip Shape: Instead of folding the corners down, fold the top edge down to form a point. This will generate the tulip’s characteristic shape.
- Finish with a Stem: Follow the steps for creating a stem, and you’ll have a beautiful tulip ready to display.
Rose: Elegant and More Advanced
The origami rose is a bit more complex but incredibly rewarding. It showcases the beauty of the craft and can be a stunning addition to any arrangement.
- Begin with a Larger Square: Use a larger piece of paper (such as 8 inches by 8 inches) for a more dramatic rose.
- Create Initial Folds: Follow the basic petal folding steps, but add additional folds to create the rose shape. This typically involves tucking and twisting sections of the paper to mimic the layers of a rose.
- Assemble and Secure: Once you have your rose shape, secure it with glue and attach a stem as described earlier.
Lotus: Ideal for Zen Inspired Decor
The lotus flower is a symbol of purity and tranquility, making it a perfect choice for zen-inspired decor.
- Use a Square Sheet: Start with a square sheet of paper and follow the basic folding techniques.
- Create the Lotus Shape: The lotus requires more intricate folds, including valley and mountain folds, to create the petal structure.
- Layer the Petals: As you fold, layer the petals to create the iconic open lotus shape.
- Add a Base: For a complete look, create a base from green paper to simulate the lotus floating on water.
Creative Uses for Origami Flowers
Origami flowers are not only beautiful but also versatile. Here are some creative ways to use them:
Table Decorations
Origami flowers can elevate any table setting. Use them as centerpieces for weddings, parties, or special occasions. Create a bouquet of mixed flowers and place them in a decorative vase for a stunning visual impact.
Personalized Gifts
A bouquet of origami flowers makes for a unique and heartfelt gift. Customize the colors and designs to suit the recipient’s taste. You can also pair the flowers with a handwritten note or card for a personal touch.
Wall Decor
Create a stunning wall display by arranging multiple origami flowers in a frame or directly on the wall. This can add a whimsical and artistic element to any room. Consider using a variety of flower types and colors for an eye-catching composition.
Origami Flowers for Kids
Introducing children to origami can be a fun and educational experience. Here are some tips for making origami flowers accessible to kids:
Simple Models
Start with simple designs that are easy for children to follow. Flowers like tulips and basic petals are great starting points. As they gain confidence, you can introduce more complex models.
Colorful and Child-Friendly Papers
Choose bright, colorful papers that appeal to children. You can also use patterned paper to make the folding process more exciting. Ensure the paper is lightweight and easy to fold, as this will make the experience enjoyable.
Encourage Creativity
Encourage children to experiment with their designs. They can create their variations of flowers or combine different models to make unique creations. This fosters creativity and helps develop fine motor skills.
Resources and Inspiration
To further your origami journey, explore various resources available online and in print:
Video Tutorials
YouTube is a treasure trove of origami tutorials, where you can find step-by-step guides for creating specific flowers. Watching these videos can help you visualize the folding process and improve your skills.
Books and Blogs
Consider picking up books dedicated to origami, which often include detailed instructions and beautiful photographs. Many blogs also feature origami patterns and tips from experienced creators.
Want More? Explore Other Origami Ideas
If you enjoy making origami flowers, why not explore other origami creations? You can find tutorials for animals, containers, and geometric designs. Each new project will enhance your skills and expand your creativity.
Conclusion
Origami is more than just a hobby; it’s an art form that fosters creativity, relaxation, and personal satisfaction. Creating origami flowers allows you to express your artistic side while enjoying a therapeutic activity. With just a few basic materials and some practice, you can transform simple sheets of paper into stunning floral masterpieces.
So, gather your supplies, follow the steps outlined in this article, and let your creativity bloom. Whether you’re making flowers for yourself, as gifts, or for decoration, the joy of origami is in the process and the beautiful results. Share your creations on social media to inspire others and connect with the vibrant origami community!